

Teaching Physical Computing with the Micro:bit: Case Study
Teaching Physical Computing with the Micro:bit: Case Study
A Pedagogical Journey


As a primary school teacher, I was looking for an engaging and interactive way to teach my Year 4 class about electricity. I found inspiration from Raspberry Pi and decided to use micro:bit, a microcontroller with built-in sensors and LEDs, to make the learning process fun and hands-on. Over six weeks, I planned and implemented a unit of work that combined programming and Teaching electricity using the micro:bit. In this newsletter, I will share my experiences and insights, including the pedagogical approaches I used and the targeted activities that supported my teaching.
These were taken from https://www.raspberrypi.org/app/uploads/2021/11/Teaching-programming-in-schools-pedagogy-review-Raspberry-Pi-Foundation.pdf
Week 1 - Introduction to Programming Concepts
In the first week, I introduced my students to basic programming concepts, such as algorithms and variables. To engage them in the learning process, I used a range of interactive activities, including unplugged games and puzzles. For example, I introduced the concept of algorithms using a step-by-step approach on how to make a sandwich or squash , where students had to write down each step of the sequence.
Algorithms and Flowcharts
We discussed how algorithms are a set of instructions that are used to solve a problem, and how flowcharts can be used to model algorithms.
To help students understand algorithms, we worked through several examples of simple algorithms and created flowcharts to represent them. We then moved on to more complex algorithms, including those involving loops and decision-making.

Activity Example:
Students worked in pairs to make a sandwich or squash
They wrote down each step of the routine in sequence using a flowchart
They swapped routines with another pair and tried to perform the action using the written instructions.
Outcome:
Students were able to understand the concept of algorithms and write down a series of steps in sequence
Week 2 - Exploring Patterns with LED Lights using Microcontrollers
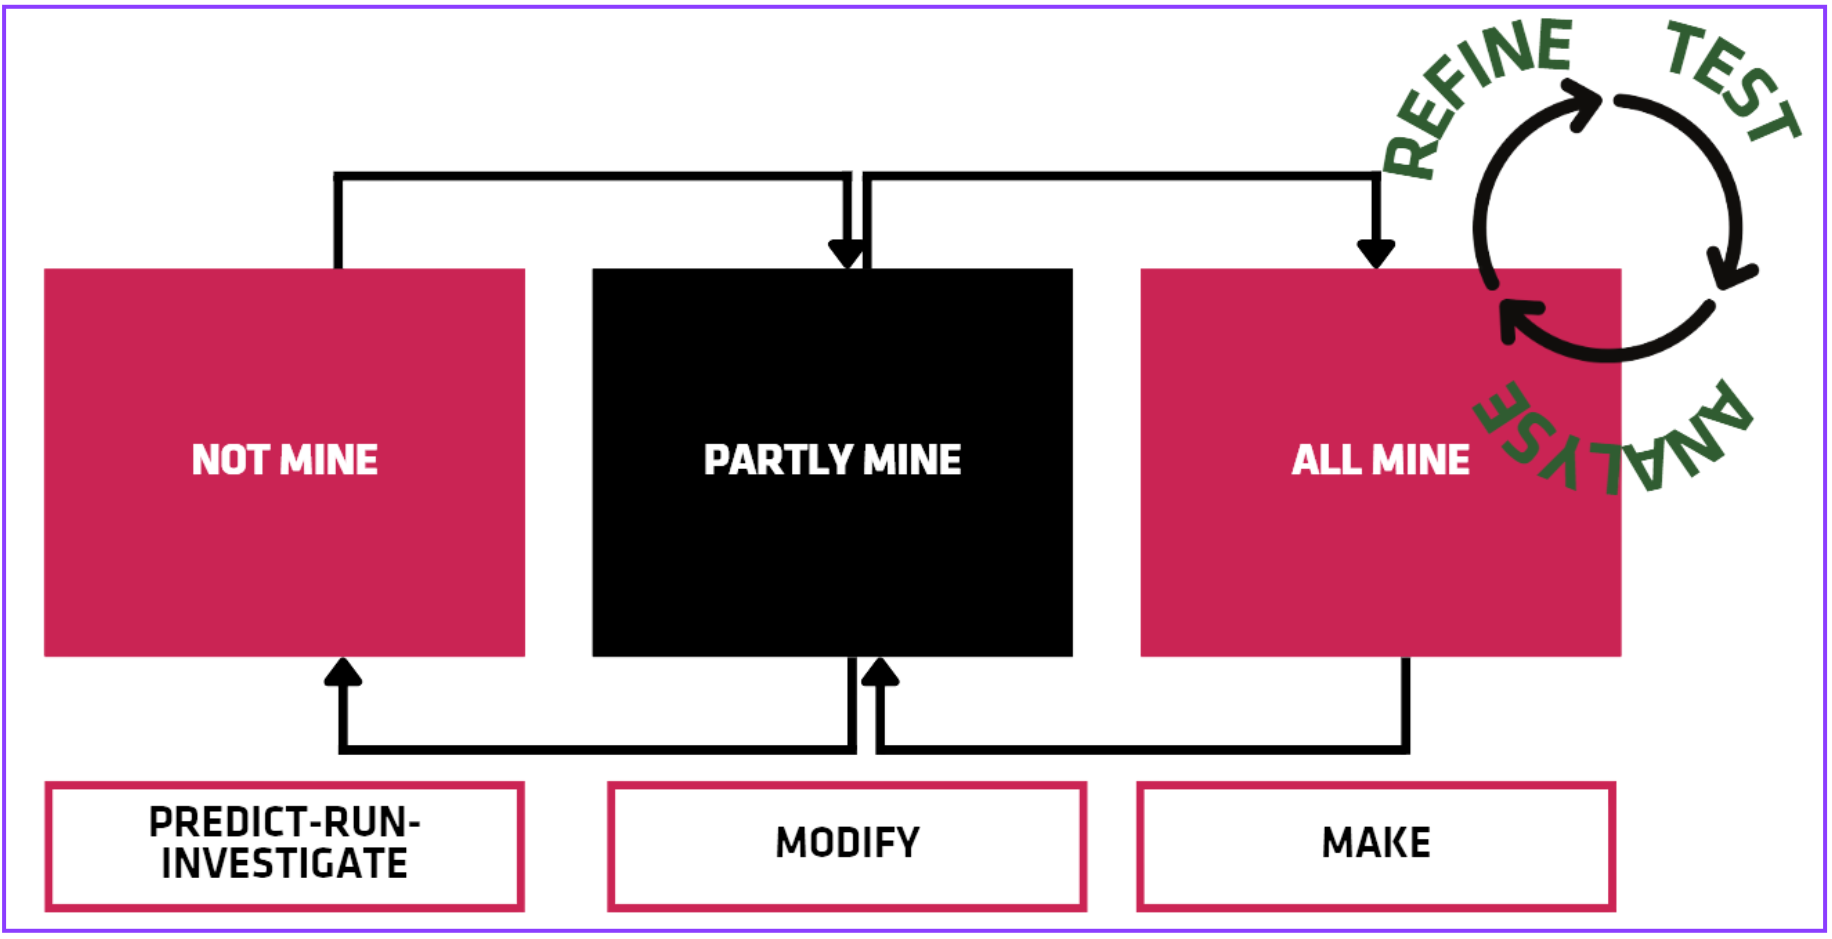
In the second week, we explored physical computing with microcontrollers, specifically the micro:bit. To help the students understand the concepts, I used Live Coding and PRIMM pedagogical approaches. Live coding involves modelling programming techniques and thought processes in front of students, while PRIMM involves using a sample program to predict output and then modifying it to create their own program.

Predict: I started by sharing a sample program with the students, such as a simple program that turns the LED lights on and off in a loop. I asked the students to predict what they think the program will do and what each line of code does.

Run: I then ran the program and showed the students what it does. We discussed whether the program did what they expected and whether they noticed anything interesting about how the lights turned on and off.
Investigate: Next, I asked the students some carefully constructed questions to help them better understand the program. For example, I asked them what each line of code does, why we need the "forever" loop, and what would happen if we changed the timing of the loop.
Modify: Then, I guided the students through modifying the program in a way that builds on their understanding of the concepts using the ‘Live Coding’ Method. For example, I modelled to them how to change the pattern of the lights and then allowed the students to explore their own patterns.
Make: Finally, I asked the students to create their own program using the concepts they've learned. For example, I asked them to create a program that makes the lights blink in a specific pattern, or to create a program that uses the buttons on the micro:bit to control the lights.
Throughout each stage, I encouraged classroom discussion to help enhance social learning and to ensure that the students are engaged and understood the concepts being taught. By using the PRIMM approach, I believe that students gained a deeper understanding of programming concepts and were better equipped to create their own programs.
Outcome:
Using these approaches, students were able to create visually stunning patterns on the LED lights using the micro:bit and the basic coding skills.

Week 3 - Targeted Tasks
In the third week, I used targeted tasks to focus my students on specific learning goals, such as programming initialisation. We used a range of activities, such as changing aspects of programs, investigating and fixing code, and following instructions. I provided feedback on their work and scaffolded the learning experiences.
One example of a targeted task was investigating and fixing code. In pairs, students worked to identify and fix a bug in a given program. To help students understand the cause of the bug, we used a flowchart. The students then wrote new code to fix the bug and tested the program. This activity was a great way to help students understand how to troubleshoot and problem-solve in programming.
Activity Example: Investigating and Fixing Code
Students work in pairs to identify and fix a bug in a program.
They use a flowchart to identify the cause of the bug.
They write a new code to fix the bug and test the program.

Outcome:
Students were able to identify and fix a bug in a program, using a flowchart to help them understand the cause of the bug.
Week 4 - Parson's Problems
In the fourth week, I used Parson's Problems as a targeted task to help my students understand programming patterns and concepts. Parson's Problems are programming problems where the code is provided, but jumbled up in a way that requires students to put it back in the correct order. This activity helps students develop their programming skills, as well as their ability to read and understand code.
Activity Example: Parson's Problems
I provided students with a Parson's Problem that required them to write a program that would light up specific LEDs on the micro:bit. The code for the program was provided, but in the incorrect order. Students were asked to rearrange the code into the correct order to make the program work. They then tested the program on the micro:bit and checked to see if the LEDs lit up as intended.
Outcome:
Students were able to identify the correct order for the jumbled code and write a program that lit up specific LEDs on the micro:bit. This activity helped them develop their programming and problem-solving skills, as well as their ability to read and understand code.
Week 5: Inputs and Outputs and Flowchart Modelling
In the fifth week, we focused on inputs and outputs and used flowchart modelling to plan our programs. We discussed how inputs and outputs are used in programming and how we could use the Micro:bit to control them.
Activity Example: Conductivity Testing
Students worked in pairs to explore which materials conducted electricity. They used a flowchart to plan their experiment and record their results. They wrote a program to display the results on the Micro:bit.

Introduced the concept of conductivity and how it relates to electricity.
Provided a range of materials for students to test, such as paper clips, coins, and pencils.
Used a flowchart to guide students through the process of testing each material and recording their results.

Outcome:
Students were able to plan and conduct an experiment to explore conductivity, and used a flowchart to model the process of their program.
Week 6: Group Project
In the final week, we worked on a group project where students had to create a program that used the Micro:bit to conduct electricity. They had to incorporate all the programming concepts they had learned during the unit into their program.
I began by demonstrating to my students how to use block-based coding to create a program that displays the results of their experiment on the Micro:bit. I showed them how to open Microsoft MakeCode and navigate to the Micro:bit editor.
Then, I demonstrated how to use the input/output blocks to program the Micro:bit to display the results of the experiment. I showed them how to use the LED display to create a visual representation of the results, and how to use the buttons to switch between different results.
Next, I worked through an example with them, showing them how to use the flowchart they created during the experiment to help guide their programming. I showed them how to break the flowchart down into smaller steps and use the appropriate input/output blocks to program each step.
Finally, I provided them with some time to work on their own, with my support and guidance, to program the Micro:bit to display the results of their experiment. I checked in with each group to answer any questions they had and provide feedback on their programming
Outcome:
This activity was a great way to introduce students to the world of physical computing and help them develop important skills in programming, problem-solving, and critical thinking. With the right guidance and support, my students were able to create their own programs and experiment with the Micro:bit in exciting and engaging ways. Students were able to plan and conduct an experiment to explore conductivity, and used a flowchart to model the process of their program.
Conclusion
In conclusion, the use of the Micro:bit to teach physical computing and coding proved to be a highly effective tool in engaging my Year 4 students. Through the use of pedagogical approaches such as live coding, PRIMM, and targeted tasks, my students were able to develop a solid foundation in programming concepts and skills.
We started with the basics of block-based coding and progressed to exploring physical computing using the Micro:bit. The use of visual aids such as diagrams, flowcharts, and guides were highly effective in supporting student learning.
Through the use of targeted tasks, such as investigating and fixing buggy code and identifying alternate programming concepts, my students were able to develop a deeper understanding of programming concepts. The use of Parson's problems provided an effective means of helping students understand patterns in programs.
At the end of the six-week unit, my students worked in pairs to create a program that used the Micro:bit to conduct electricity. The use of flowchart modelling helped them plan their experiments, and they used block-based coding to create a program that displayed their results on the Micro:bit.
The outcomes of this unit were highly positive, with my students showing a greater level of engagement and enthusiasm towards programming and physical computing. They were able to apply their knowledge and skills in creating their programs and experimenting with physical computing concepts.
Overall, I highly recommend the use of the Micro:bit as a tool for teaching physical computing and programming concepts to primary school students. The use of pedagogical approaches such as live coding, PRIMM, and targeted tasks, along with the use of visual aids and hands-on experimentation, can lead to highly effective learning outcomes.

Thank you for tuning into The Connected Classroom! I hope this newsletter has provided valuable insights and practical examples for using EdTech tools.I believe that technology has the power to enhance and transform education, and I’m excited to share that with you. If you have any questions or suggestions, please don't hesitate to reach out. Thank you again for being a part of The Connected Classroom community.
WOW! What a great lesson! Taught high school math for 36 years, and this is the kind of critical thinking skills I always hoped my students had at least been exposed to in their earlier years.